New House Walk Through Checklist PDF: A Comprehensive Plan
Navigating a new home purchase requires diligence; a detailed PDF checklist ensures a smooth final walkthrough, verifying completion and addressing potential issues before closing.

The final walkthrough is a crucial step in the home-buying process, offering a last chance to inspect the property before finalizing the purchase. This isn’t a home inspection; it confirms agreed-upon repairs are completed and the home’s condition matches the sales agreement.
Utilizing a comprehensive checklist, ideally in PDF format for easy portability and annotation, is essential. It allows prospective homeowners to systematically assess the property, identifying any discrepancies or unfinished items. A new home deserves a thorough review, preventing future headaches and ensuring satisfaction.
Remember to approach this walkthrough with a keen eye, documenting everything with photos and notes.
II. Preparing for the Walkthrough
Prior to your final walkthrough, download and customize a new construction checklist PDF. Redfin and Workyard offer excellent templates; tailor it to your specific property’s features and agreed-upon repairs. Schedule the walkthrough with your builder or realtor, allowing ample time – don’t rush!
Ensure the property is vacant and utilities are connected. This allows for a complete systems check. Review your purchase agreement, noting all agreed-upon fixes. Bring a printed copy of the checklist, alongside your camera or smartphone for documentation.
Preparation is key to a productive and stress-free final inspection.
III. Essential Tools & Documents to Bring
For a thorough final walkthrough, arm yourself with the right tools. A printed new house walkthrough checklist PDF is paramount – don’t rely solely on digital copies. A camera or smartphone is crucial for documenting any discrepancies found during the inspection.

Bring a copy of your purchase agreement, highlighting completed and pending repairs. A measuring tape can verify dimensions, and a small notepad is useful for jotting down quick notes. A flashlight helps inspect dark corners and closets.
These items ensure you’re prepared to identify and document any issues efficiently.

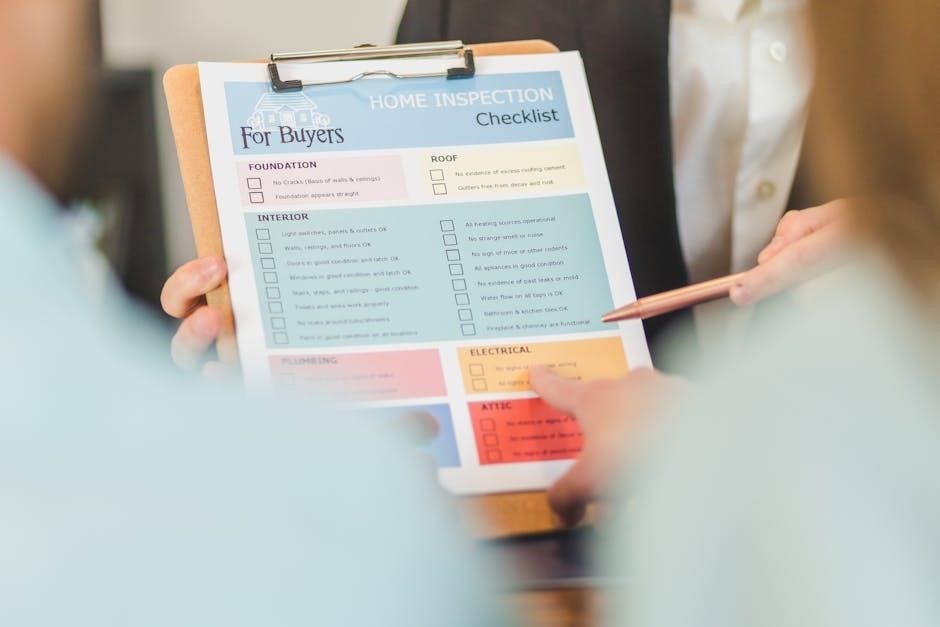
A. Checklist (PDF or Printed)
A comprehensive new house walkthrough checklist, available as a PDF or printed document, is your most valuable asset. These checklists systematically guide you through each area of the property, ensuring nothing is overlooked.
Downloadable templates from resources like Redfin or Workyard offer a solid foundation, but customization is key. Tailor the checklist to reflect specific features and agreed-upon repairs in your purchase agreement.
Having a physical copy allows for easy note-taking, even without reliable internet access; It’s the cornerstone of a successful final inspection.
B. Camera or Smartphone
Bring a camera or, more conveniently, your smartphone to document the walkthrough thoroughly. Visual evidence is crucial when creating a “punch list” of items needing correction by the builder or developer.
Photographs and videos provide a clear record of any defects, discrepancies, or unfinished work. This documentation supports your requests for repairs and protects your interests during the closing process.
Ensure photos are date-stamped for added credibility. A detailed visual record streamlines communication and helps resolve potential disputes efficiently.
IV. Exterior Walkthrough Checklist
Begin with the exterior, assessing landscaping and grading for proper drainage away from the foundation. Inspect exterior walls and siding for damage, cracks, or improper installation.
Carefully examine the roof and gutters, ensuring they are secure, free of debris, and functioning correctly. Check for missing or damaged shingles. Verify that all exterior features, like walkways and driveways, are in good condition.
Document any issues with photos, noting their location and severity. A thorough exterior inspection prevents costly repairs down the line and ensures curb appeal.
A. Landscaping & Grading
Inspect the landscaping for completed installations as per the contract, verifying plant health and proper placement. Assess the grading around the foundation, ensuring positive slope for effective water drainage away from the house.
Look for signs of erosion or standing water, which could indicate drainage problems. Confirm that all irrigation systems are functioning correctly, with no leaks or broken sprinkler heads. Document any discrepancies between the landscaping plan and the actual installation.
Proper grading and landscaping are crucial for preventing foundation issues and maintaining property value.
B. Exterior Walls & Siding

Thoroughly examine the exterior walls and siding for any visible damage, such as cracks, dents, or missing pieces. Check for proper alignment and secure attachment of all siding materials. Inspect around windows and doors for adequate sealing and caulking to prevent water intrusion.
Verify that the paint or stain is evenly applied and free of blemishes. Look for any signs of mold or mildew growth, particularly in shaded areas. Confirm that all exterior fixtures, like lights and hose bibs, are securely mounted and functioning correctly.
Addressing these issues early prevents costly repairs later.
C. Roof & Gutters
Visually inspect the roof for missing, damaged, or improperly installed shingles or tiles. Look for any signs of sagging or unevenness, which could indicate structural issues. Examine flashing around chimneys, vents, and skylights for proper sealing and condition.
Ensure gutters are securely attached and free of debris, allowing for proper water drainage away from the foundation. Check downspouts for correct placement and functionality. Confirm there are no leaks or signs of water damage around the roofline or gutters;
Proper roof and gutter maintenance is crucial for long-term home protection.
V. Interior Walkthrough Checklist ― General
Thoroughly inspect all walls for cracks, holes, or uneven surfaces, and ensure paint is applied smoothly and consistently. Check ceilings for water stains or signs of damage, indicating potential leaks. Examine flooring throughout the house, verifying it’s properly installed and free from defects like scratches or gaps.
Test all light switches and ensure they operate correctly. Verify that windows and doors open and close smoothly, and that locks function as expected. Look for any signs of drafts or air leaks around windows and doors, impacting energy efficiency.
A general interior check establishes a baseline for overall quality.
A. Walls, Ceilings & Floors
Meticulously examine all wall surfaces for imperfections – nail pops, cracks, or uneven textures. Ensure paint application is consistent, without drips or missed spots. Inspect ceilings for any water stains, indicating potential roof leaks or plumbing issues. Check for smooth transitions between wall and ceiling.
Verify flooring installation is flawless; tiles should be level, hardwood without gaps, and carpet securely fastened. Look for scratches, dents, or discoloration. Test for squeaks or unevenness underfoot. Confirm baseboards are securely attached and free from damage.
B. Doors & Windows
Systematically test every door within the property, ensuring smooth operation – opening, closing, and latching correctly. Check for proper alignment and gaps that could affect energy efficiency or security. Inspect door frames for damage or warping. Verify all locks function as intended.
Examine all windows for cracks, chips, or broken seals. Operate each window to confirm easy opening and closing, and proper locking mechanisms. Check window screens for tears or damage. Ensure windows are properly sealed to prevent drafts and water intrusion.
VI. Interior Walkthrough Checklist ౼ Specific Rooms
Focusing on individual rooms during the walkthrough is crucial. Begin with the kitchen, testing all appliances – stove, oven, dishwasher, microwave, and refrigerator – to ensure proper functionality. Inspect cabinets and countertops for damage. Move to bathrooms, checking for leaks under sinks and around toilets, and verifying proper ventilation.
In bedrooms, assess closet space and ensure doors operate smoothly. Examine flooring and wall conditions in each room. Document any discrepancies or needed repairs. Remember to check lighting fixtures and outlets in every space, noting any issues for the punch list.

A. Kitchen Inspection
Thoroughly inspect all kitchen appliances: confirm the stove, oven, dishwasher, microwave, and refrigerator are functioning correctly. Test each appliance through a full cycle if possible. Check cabinet doors and drawers for proper alignment and smooth operation, noting any damage. Examine countertops for scratches, stains, or uneven surfaces.
Verify the functionality of the kitchen sink and garbage disposal. Inspect plumbing under the sink for leaks. Ensure all electrical outlets are working. Document any issues, even seemingly minor ones, to include on your final punch list for the builder’s attention.
B. Bathroom Inspection
Meticulously inspect all bathroom fixtures: toilets, sinks, showers, and bathtubs. Flush toilets multiple times to check for leaks or weak flushing power. Run water in sinks and showers, observing drainage and water temperature. Examine grout and caulking for cracks or mildew, paying close attention to shower enclosures.
Test all bathroom electrical outlets, including those for hair dryers or electric toothbrushes. Check the functionality of exhaust fans. Inspect cabinet doors and drawers for proper alignment. Document any discovered defects, adding them to your punch list for resolution before closing.
C. Bedroom Inspection
Thoroughly examine each bedroom, starting with the walls and ceilings for any signs of damage, such as cracks or water stains. Test all windows and doors to ensure smooth operation and proper locking mechanisms. Check the functionality of all electrical outlets and light fixtures within each bedroom.
Inspect closet spaces, verifying adequate shelving and hanging rods. Confirm the proper operation of any ceiling fans. Document any issues with flooring, including scratches or loose boards. Add any discovered defects to your punch list, ensuring they are addressed before finalizing the home purchase.
VII. Systems & Appliances Check
Verify the proper functioning of the HVAC system, testing both heating and cooling modes. Inspect the plumbing system, running faucets and flushing toilets to check for leaks and adequate water pressure. Confirm all electrical outlets are working correctly and that the electrical panel is labeled clearly.
Test all included appliances – oven, dishwasher, refrigerator, washer, and dryer – ensuring they operate as expected. Check for any unusual noises or malfunctions. Document any issues with these systems on your punch list, as these are crucial components of a functional home, requiring immediate attention.
A. HVAC System (Heating, Ventilation, & Air Conditioning)
Thoroughly test the heating system, ensuring it cycles on and off correctly and distributes heat evenly throughout the house. Verify the cooling system functions similarly, providing consistent and adequate air conditioning. Check the thermostat settings and programming for proper operation.
Inspect air vents for obstructions and ensure they are all open and directing airflow as intended. Listen for any unusual noises coming from the unit itself. Document the model numbers of both the heating and cooling components for future reference and maintenance scheduling.
B. Plumbing System
Systematically check all faucets – kitchen, bathroom, and any outdoor spigots – for proper water pressure, both hot and cold. Inspect under sinks for any signs of leaks or water damage. Flush every toilet multiple times to ensure proper flushing action and check for leaks around the base.
Run water in all showers and tubs, observing the drain speed and looking for any leaks around the fixtures. Verify the water heater is functioning correctly and set to the appropriate temperature. Document the location of the main water shut-off valve for emergency situations.
C. Electrical System & Outlets
Thoroughly test all electrical outlets in every room using a phone charger or small appliance to confirm they are functioning. Flip all light switches, including dimmer switches, to ensure proper operation. Inspect the electrical panel, verifying that all breakers are labeled correctly and that there are no signs of damage.
Check Ground Fault Circuit Interrupter (GFCI) outlets in bathrooms, kitchens, and outdoors by pressing the “test” and “reset” buttons. Confirm smoke detectors and carbon monoxide detectors are installed, powered, and functioning correctly. Document the location of the electrical panel for future reference.
VIII. Creating a “Punch List”
A “punch list” meticulously documents all incomplete or unsatisfactory items discovered during the final walkthrough. Be specific and detailed when noting deficiencies – avoid vague descriptions. Include photos to visually represent each issue, strengthening your documentation. Categorize items by priority: critical (safety concerns), major (functional issues), and minor (cosmetic flaws).
Ensure the punch list is presented to the builder/developer in writing, with a clear request for resolution before closing. Retain a copy for your records, and establish a timeline for completion. This list is crucial for negotiating repairs and ensuring a satisfactory outcome.
IX. Negotiating Punch List Items & Timeline
Effectively negotiating punch list items requires a calm, reasonable approach. Prioritize critical items – safety concerns and functional defects – and be firm on their resolution before closing. For minor cosmetic issues, consider negotiating a price reduction or allowance instead of demanding repair. Establish a realistic timeline for completion, factoring in material availability and contractor schedules.
Get all agreements in writing, detailing specific repairs, completion dates, and consequences for non-compliance. Understand that the builder may resist certain requests; be prepared to compromise, but don’t concede on essential fixes.
X. Utilizing Checklist Templates (PDF, Word, Excel)
Leveraging pre-made checklist templates – available in PDF, Word, or Excel formats – streamlines the walkthrough process. These templates provide a comprehensive framework, ensuring you cover all essential areas, from landscaping to appliances. Downloadable options from sources like Redfin or Workyard offer a convenient starting point.
Customize the template to reflect your home’s specific features and any unique concerns. Excel allows for easy modification and tracking, while PDF versions are ideal for printing and on-site note-taking. A well-utilized template promotes thoroughness and organization.
XI. The Role of a Home Inspector During Walkthrough
While not always mandatory, engaging a home inspector for the final walkthrough offers invaluable expertise. They possess a trained eye for identifying potential issues often missed by untrained observers, ensuring agreed-upon repairs are correctly addressed. An inspector’s report provides objective documentation, strengthening your position during negotiations.
Consider their assessment a second opinion, validating the builder’s completion of work. This is particularly beneficial for complex systems like HVAC or plumbing. Remember, the goal is to proactively address concerns before closing, and a professional inspection aids in achieving this.
XII. Understanding Builder/Developer Responsibilities
Builders and developers are legally obligated to deliver a home conforming to agreed-upon plans and local building codes. The final walkthrough is your opportunity to verify this fulfillment. They are responsible for completing all items on the initial contract, including repairs identified during previous inspections.
Expect a willingness to address legitimate concerns raised during the walkthrough, documented via a “punch list.” Understanding the timeline for completion is crucial; negotiate reasonable deadlines and a clear process for follow-up. A reputable builder prioritizes customer satisfaction and timely resolution of issues.
XIII. Legal Considerations & Documentation
The final walkthrough isn’t merely a courtesy; it’s a critical step with legal implications. Document everything meticulously – photos, videos, and a detailed “punch list” – as evidence of any discrepancies. Ensure all agreed-upon repairs are outlined in writing, signed by both parties, and attached to the purchase agreement.
Review your contract regarding builder warranties and dispute resolution processes. Consult with a real estate attorney if concerns arise or if the builder is unresponsive. Proper documentation protects your investment and provides recourse should issues persist post-closing, safeguarding your rights as a homeowner.
XIV. Post-Walkthrough Follow-Up
Following the walkthrough, promptly submit your “punch list” to the builder in writing, establishing a clear timeline for completion of repairs. Maintain consistent communication, documenting all interactions and agreements. Schedule a re-inspection once repairs are purportedly finished to verify satisfactory completion.

If issues remain unresolved, consider mediation or legal counsel. Retain all documentation – the original purchase agreement, walkthrough checklist, repair requests, and communication logs – as evidence. A proactive follow-up ensures a smooth transition into your new home, protecting your investment and peace of mind.
XV. Common Issues Found During Walkthroughs
Frequently encountered problems include minor drywall imperfections, paint touch-ups needed, and misaligned doors or windows. Inspect for plumbing leaks under sinks and around toilets, alongside proper operation of all appliances. Electrical outlets may be non-functional, and flooring may exhibit scratches or gaps;
Exterior concerns often involve landscaping deficiencies, grading issues affecting drainage, and siding imperfections. HVAC systems might require adjustments, and gutter functionality should be verified. Utilizing a detailed checklist helps identify these common issues, ensuring they are addressed before closing, safeguarding your investment.
XVI. Walkthrough Checklist Customization
Standard checklists provide a solid foundation, but tailoring them to your specific new home is crucial. Consider unique features like smart home systems, custom cabinetry, or specific landscaping requests. Add items reflecting agreed-upon upgrades or modifications detailed in your purchase agreement.
Prioritize areas of concern based on your home’s design and construction. Downloadable templates (PDF, Word, Excel) offer flexibility for personalization. Document any pre-existing conditions noted during earlier inspections. A customized checklist ensures a thorough review, addressing your individual needs and expectations effectively.

XVII. Digital Walkthrough Tools & Apps
Beyond traditional PDF checklists, several digital tools streamline the walkthrough process. Apps like Workyard and others offer features for documenting issues with photos and assigning responsibility. These platforms facilitate real-time collaboration with builders and streamline “punch list” management.
Digital tools often include cloud storage for easy access and sharing. Some apps integrate with project management software, enhancing communication and tracking progress. Utilizing these resources can improve organization, reduce paperwork, and ensure a more efficient final inspection of your new home.
XVIII. Final Walkthrough Before Closing Date
The final walkthrough, guided by your new house walkthrough checklist PDF, is a crucial step just prior to closing. Its purpose is to confirm the property’s condition matches the agreed-upon state, and that any previously identified issues have been resolved. This isn’t a home inspection, but a verification of completed repairs.
Schedule this walkthrough with sufficient time to address any remaining concerns. Bring your completed checklist and documentation. If discrepancies exist, document them thoroughly and communicate them to your realtor for negotiation before the closing date.
XIX. Resources for Downloadable Checklists
Numerous online resources offer free new house walkthrough checklist PDF templates to streamline your final inspection. Websites like Redfin and Workyard provide customizable options, catering to diverse needs and property types. Excel, Word, Google Docs, and Google Sheets formats are also readily available for download.
These checklists typically cover exterior, interior, systems, and appliance checks. Utilizing a pre-made template saves time and ensures you don’t overlook critical areas. Remember to personalize the checklist to reflect your specific home’s features and any agreed-upon modifications.