
Buture Car Jump Starter Manual: A Comprehensive Guide
Buture jump starters offer reliable solutions for vehicle emergencies, featuring models like Beta01, Beta03, Beta04, and SC10, each with unique capabilities and features.
Understanding Buture Jump Starters
Buture jump starters are designed to provide a safe and efficient boost when your vehicle battery fails. These portable powerhouses deliver high peak currents – ranging from 2500A to 6000A depending on the model – capable of starting cars, trucks, motorcycles, and more.
Unlike traditional jump leads requiring another vehicle, Buture units are self-contained, offering independence in emergency situations. Key models include the Beta01, equipped with an integrated air compressor; the Beta03, featuring a ‘Force Start’ function for stubborn batteries; the Beta04, boasting a powerful 6000A output; and the innovative SC10, utilizing supercapacitor technology for rapid recharging and instant starts. Understanding your specific Buture model is crucial for optimal performance and safety.
Buture Model Overview (Beta01, Beta03, Beta04, SC10)
Buture offers a diverse range of jump starters to suit various needs. The Beta01 combines jump starting power (2500A) with a 150PSI air compressor, ideal for roadside assistance. The Beta03 (5000A) includes a ‘Force Start’ function, assisting with deeply discharged batteries.
Stepping up in power, the Beta04 (6000A) can start up to 12L gasoline and diesel engines, featuring a compact and water-resistant design. Finally, the SC10 utilizes advanced supercapacitor technology, eliminating the need for a fully charged battery – it leverages residual power for quick recharges and immediate jump starts. Each model provides a portable and reliable solution for vehicle emergencies, differing in features and capacity.
Key Features and Specifications
Buture jump starters boast impressive peak currents, ranging from 2500A (Beta01) to 6000A (Beta04), capable of starting various engine sizes – gasoline up to 8.5L and diesel up to 8.0L, or even 12L with the Beta04.
Beyond jump starting, key features include integrated air compressors (Beta01, providing 150PSI), bright LED spotlights for emergency illumination, and smart safety protections against reverse polarity, over-discharge, and overheating. The innovative SC10 model utilizes supercapacitor technology, offering battery-less operation and rapid recharging. Compact, portable designs and durable construction ensure reliability in diverse conditions, making Buture a trusted choice.
Safety Precautions
Buture jump starters require careful handling; always prioritize safety by following guidelines, connecting cables correctly (red to positive, black to negative), and securing the vehicle.
General Safety Guidelines
Prioritize safety when using your Buture jump starter. Always wear appropriate eye protection to shield against potential sparks or acid splashes. Ensure the jump starter is fully charged before attempting to jump-start a vehicle. Never attempt to jump a frozen battery, as it could explode.
Work in a well-ventilated area, as batteries release flammable gases. Keep the jump starter away from flammable materials. Do not allow the clamps to touch each other while connected to a battery. Inspect cables for damage before each use; replace if frayed or cracked. Avoid contact with battery acid – if contact occurs, flush immediately with water and seek medical attention.

Buture recommends reading the full manual before operation to understand all safety features and precautions specific to your model.
Proper Cable Connection Procedures (Red to +, Black to -)
Correct cable connection is crucial for a safe jump start. Begin by connecting the red clamp to the positive (+) terminal of the dead battery. This is typically marked with a plus sign or a red cover. Next, connect the black clamp to a solid, unpainted metal surface on the vehicle’s chassis, away from the battery.
Crucially, avoid connecting the black clamp directly to the negative (-) terminal of the dead battery, as this can create sparks and ignite flammable gases. Ensure a secure connection for both clamps before proceeding. Double-check polarity – red to positive, black to ground – to prevent damage to the vehicle’s electrical system.
Buture emphasizes following this sequence meticulously for optimal performance and safety.
Emergency Brake and Vehicle Positioning
Prior to jump starting, ensure the vehicle with the dead battery is securely positioned. Engage the emergency brake firmly to prevent any unintended movement during the process. Place the vehicle in “Park” (automatic transmission) or “Neutral” (manual transmission). This minimizes the risk of rolling or sudden acceleration once the engine starts.
Maintain a safe distance between the vehicles involved, avoiding any physical contact. Ensure both vehicles are switched off completely. Buture recommends a clear, well-ventilated area for jump starting, away from flammable materials. Proper vehicle positioning and brake engagement are fundamental safety measures.
Always prioritize safety by following these guidelines before connecting the jump starter cables;

Jump Starting Procedure
Follow a step-by-step guide to safely jump start your vehicle using the Buture jump starter, ensuring correct cable connections and engine ignition.
Step-by-Step Jump Start Guide
Begin by positioning the vehicle with the emergency brake engaged and in park (or neutral for manual transmissions). Locate the vehicle’s battery terminals. Connect the red clamp to the positive (+) terminal and the black clamp to the negative (-) terminal, ensuring a secure connection.
Turn on the jump starter and select the appropriate voltage. Attempt to start the vehicle. If it doesn’t start immediately, wait a minute and try again. The Beta03 model features a ‘Force Start’ function for stubborn batteries – utilize this if initial attempts fail.
Once started, carefully disconnect the clamps in reverse order (black first, then red) and allow the vehicle to run for several minutes to recharge its battery. Always refer to your Buture model’s specific instructions for optimal results.
Using the Force Start Function (Beta03)
The Beta03 model incorporates a ‘Force Start’ function designed to jump-start vehicles with deeply discharged or problematic batteries. If standard jump-starting attempts are unsuccessful – after correctly connecting the clamps – this feature can be activated.
To engage Force Start, typically a prolonged press or specific button combination is required (consult your Beta03 manual for exact instructions). This delivers a higher voltage surge to overcome battery resistance.
However, use Force Start cautiously, as it can potentially stress the vehicle’s electrical system. It’s best employed as a last resort and only after verifying correct cable connections. Following a successful jump, allow the vehicle to run for an extended period to recharge.
Jump Starting Gas vs. Diesel Engines
Buture jump starters are capable of starting both gasoline and diesel engines, but the process and required amperage differ. Diesel engines, due to their compression ignition, generally require higher cranking amps than gasoline engines.
The Beta04, for example, can handle 12L gas and diesel engines, while the Beta01 supports 8.5L gas and 8.0L diesel. Always confirm your Buture model’s specifications match your vehicle’s engine size.
When jump-starting a diesel, ensure a solid connection and potentially allow a slightly longer cranking time. Gasoline engines typically start more readily. Regardless of engine type, always follow the safety precautions outlined in this manual.
Charging and Maintenance
Maintaining your Buture jump starter involves regular charging and proper storage to ensure optimal performance and longevity for future emergency situations.
Charging the Jump Starter
To ensure your Buture jump starter is always ready for use, consistent charging is crucial. Utilize the provided charging adapter and connect it to a standard wall outlet; The device features indicator lights displaying the charging progress; observe these to understand the current power level.
A full charge typically takes several hours, depending on the model and initial battery state. Avoid overcharging, as it can potentially reduce the lifespan of the internal battery. It’s recommended to charge the jump starter after each use, even if it wasn’t fully depleted, to maintain peak performance. Regularly checking the charge level will help you proactively prepare for unexpected vehicle issues.
Checking Power Capacity

Monitoring the power capacity of your Buture jump starter is essential for confirming its readiness. Most models feature a power button that, when pressed, activates an LED display indicating the remaining charge level. This display typically shows a percentage or a series of bars representing the battery’s state.
To check the power capacity again, simply press the power button once. Regularly performing this check, especially before long trips or during colder weather, ensures you won’t be caught off guard with a depleted device. Understanding the remaining capacity allows for timely recharging, guaranteeing reliable performance when you need it most.
Storage Recommendations
Proper storage is crucial for maintaining the longevity and performance of your Buture jump starter. It’s recommended to store the device in a cool, dry environment, away from direct sunlight and extreme temperatures. Avoid storing it in locations exposed to moisture or humidity, as this can damage the internal components.
Ideally, store the jump starter with approximately 50-70% charge. Fully charging or completely depleting the battery before long-term storage can reduce its lifespan. Periodically check the charge level – every few months – and top it up if necessary. Following these guidelines will ensure your Buture jump starter remains reliable for years to come.

Advanced Features
Buture jump starters boast innovative features like integrated air compressors, powerful LED spotlights, and supercapacitor technology, enhancing their versatility and user experience.
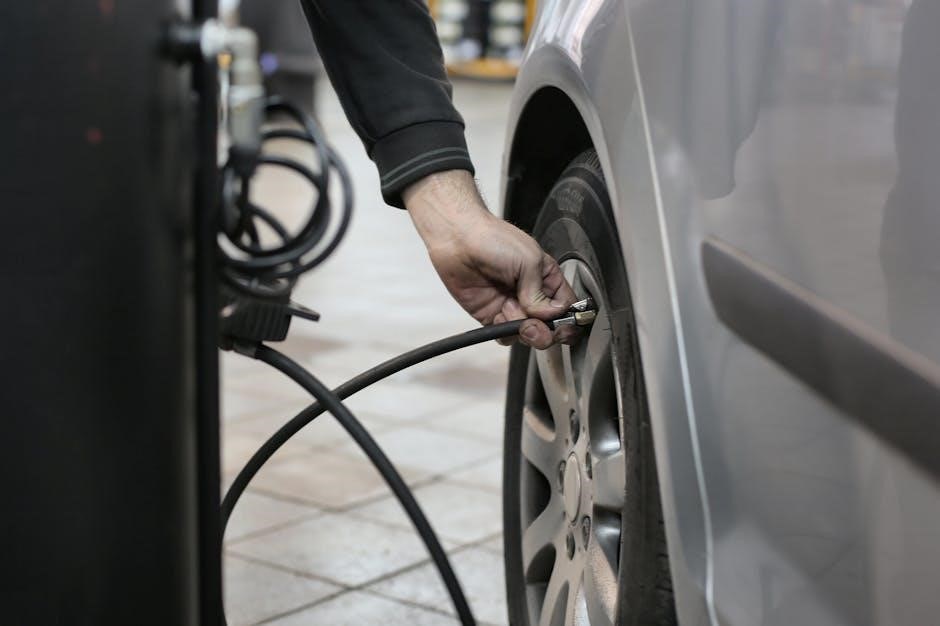
Integrated Air Compressor (Beta01)
The Buture Beta01 model distinguishes itself with a built-in air compressor, capable of delivering up to 150 PSI of air pressure. This integrated feature provides convenient on-the-go tire inflation, eliminating the need for a separate air pump during roadside emergencies or for maintaining optimal tire pressure.
Users can quickly inflate car tires, bicycle tires, or even sports equipment. The compressor is easily accessible and operated directly from the jump starter unit. This dual functionality makes the Beta01 a valuable asset for drivers, combining essential jump starting capabilities with the practicality of a portable air compressor, enhancing preparedness and convenience on the road.

LED Spotlight Functionality
Buture jump starters, particularly the Beta04 model, incorporate a powerful integrated LED spotlight. This feature provides crucial illumination during nighttime emergencies or when working in low-light conditions. The spotlight offers multiple lighting modes, including a bright steady beam and a flashing SOS signal for attracting attention.
Its convenient design allows for hands-free operation, enhancing safety and visibility while jump starting a vehicle or performing roadside repairs. The LED spotlight is a valuable addition, transforming the jump starter into a versatile tool for various situations beyond just battery boosting, ensuring users are prepared for unexpected circumstances.
Supercapacitor Technology (SC10)
Buture’s SC10 model represents a new generation in jump starting technology, utilizing advanced supercapacitor technology instead of a traditional battery. This innovative approach allows the SC10 to harness a vehicle’s remaining weak battery power, or even an external power source, for rapid recharging.
Unlike conventional jump starters, the SC10 doesn’t require lengthy charging times. It can be quickly replenished and ready for immediate use, providing instant jump starting capability. This makes it exceptionally reliable in emergency situations where time is critical. The supercapacitor design also boasts a longer lifespan and enhanced performance in extreme temperatures.

Troubleshooting
Buture jump starters offer solutions for common issues, including jump start failures and error codes; understanding these can quickly resolve problems and restore functionality.
Common Issues and Solutions
Encountering difficulties? Several common issues can arise with Buture jump starters. A frequent problem is incorrect cable connection – ensure red clamps firmly attach to the positive (+) terminal and black clamps to the negative (-) terminal.
If the jump starter fails to initiate a jump, verify the device is adequately charged. Low power capacity is a primary cause of failure. For models like the Beta03, attempting a jump three times might trigger the need for the ‘Force Start’ function.
Another issue could be a deeply discharged vehicle battery. While Buture units are powerful, extremely depleted batteries may require a longer charging period before a successful jump start is possible. Always consult the manual for specific troubleshooting steps related to your model.
What to Do if Jump Starting Fails
Jump start unsuccessful? Don’t repeatedly attempt to jump the vehicle. First, double-check the cable connections, ensuring a secure grip on both positive and negative terminals. Confirm the jump starter has sufficient charge; a depleted unit won’t deliver enough power.
If using the Beta03, consider activating the ‘Force Start’ function after three unsuccessful attempts with correct connections. However, recognize that severely damaged or deeply discharged batteries may not respond, even with a powerful jump starter.
In such cases, it’s advisable to call for professional roadside assistance or battery replacement. Continuing to attempt a jump could potentially damage the jump starter or the vehicle’s electrical system. Prioritize safety and seek expert help when needed.
Error Code Interpretation (if applicable)
Buture jump starters, particularly newer models, may display error codes to indicate specific issues. While not all models feature extensive error code systems, understanding potential signals is crucial. A flashing red light often signifies a connection problem – check cable clamps for secure attachment to the battery terminals.
A rapid blinking pattern could indicate low voltage, suggesting the jump starter itself needs recharging. Some models might display a code related to over-temperature protection, meaning the unit overheated and requires cooling before reuse.
Consult the specific model’s detailed manual for a comprehensive list of error codes and their corresponding solutions. If an unfamiliar code appears, contacting Buture customer support is recommended for accurate diagnosis and guidance.