
Assure Platinum Glucometer User Manual: A Comprehensive Guide
Welcome! This detailed manual provides essential instructions for effectively using your Assure Platinum Glucometer, ensuring accurate blood glucose monitoring and informed healthcare decisions․
The Assure Platinum Glucometer is a vital tool for individuals managing diabetes, offering a convenient and reliable method for monitoring blood glucose levels at home․ This device empowers you to actively participate in your healthcare, making informed decisions about diet, exercise, and medication․ Accurate self-monitoring is crucial for maintaining optimal health and preventing potential complications associated with diabetes․
This glucometer utilizes advanced biosensor technology to provide fast and precise readings with a small blood sample․ It’s designed for ease of use, featuring a clear display and simple operation․ The Assure Platinum Glucometer is intended for in vitro diagnostic use only and should be used according to the instructions outlined in this manual․ Regular monitoring, guided by your healthcare professional, will contribute significantly to effective diabetes management and a better quality of life․
Understanding the Kit Contents
Your Assure Platinum Glucometer kit includes several essential components to ensure accurate and convenient blood glucose testing․ Carefully verify that all items are present before beginning use․ The kit contains: one Assure Platinum Glucometer, a lancing device with adjustable depth settings for personalized comfort, a supply of sterile lancets for single-use, and a bottle of control solution to verify the glucometer’s functionality․
Additionally, you’ll find a set of test strips specifically designed for use with the Assure Platinum Glucometer – do not use other test strips․ A comprehensive user manual, like this one, is also included․ Finally, the kit provides a logbook for recording your blood glucose readings, aiding in tracking trends and sharing information with your healthcare provider․ Retain all components and this manual for future reference and proper operation․
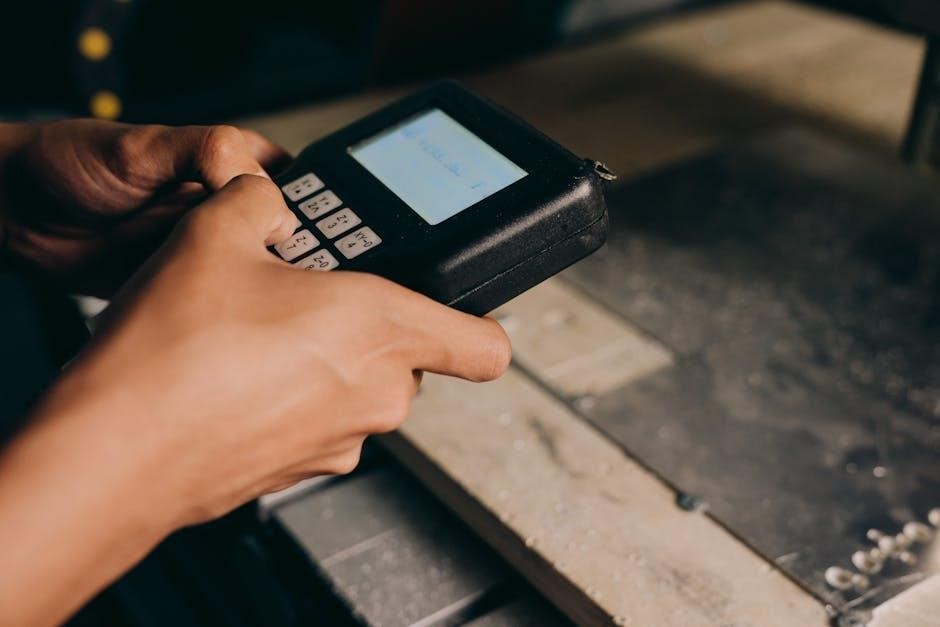
Setting Up Your Glucometer
Preparing your Assure Platinum Glucometer for initial use is a straightforward process․ Before you begin, ensure your hands are clean and dry․ The glucometer requires a battery to operate; installation instructions are detailed in the ‘Inserting the Battery’ section․ Once the battery is correctly installed, you must load the test strips․
The test strip port is located on the side of the device․ Gently insert the test strip into the port, ensuring the arrow on the strip aligns with the port’s direction․ The glucometer will power on automatically and display a readiness symbol․ Important: Do not touch the metallic strip area with your fingers․ Proper setup is crucial for accurate readings and reliable performance․ Refer to the following sections for detailed instructions on battery insertion and test strip loading․
Inserting the Battery
Powering your Assure Platinum Glucometer begins with correct battery installation․ Locate the battery compartment, typically on the back or bottom of the device․ Gently slide the battery compartment cover open․ Insert two AAA batteries, observing the correct polarity (+ and -) as indicated inside the compartment․ Ensure the batteries are securely seated and making good contact․
Once the batteries are in place, carefully slide the battery compartment cover back into its original position until it clicks shut․ The glucometer should now power on automatically, displaying a welcome message or readiness indicator․ Important: Always use fresh, high-quality AAA batteries for optimal performance․ Replace batteries when the low battery indicator appears on the screen to avoid inaccurate readings․

Loading the Test Strips
Preparing for accurate testing requires proper test strip loading․ Locate the test strip port on your Assure Platinum Glucometer – it’s usually on the side or front․ Ensure your hands are clean and dry before handling the test strips․ Gently remove a single test strip from the vial, avoiding touching the metallic contact strip․ Immediately close the vial tightly to maintain strip integrity․
Insert the test strip firmly into the test strip port, ensuring it clicks into place․ The glucometer will typically display a symbol indicating the strip is recognized․ Important: Do not reuse test strips․ Discard used strips safely․ Verify the expiration date on the vial before use; expired strips can yield inaccurate results․ The glucometer is now ready to receive your blood sample․
Performing a Blood Glucose Test

Accurate self-monitoring begins with a correctly performed test․ First, ensure your glucometer is set up with a loaded test strip․ Prepare the lancing device with a fresh lancet, adjusting the depth setting to suit your skin type․ Wash your hands thoroughly with soap and warm water, then dry completely․ Select a testing site – typically the fingertip, but alternate sites may be used as directed by your healthcare provider․
Once ready, apply the lancing device to the chosen site and press to obtain a small blood sample․ Gently massage the finger to encourage blood flow․ Apply the blood sample to the designated area on the test strip, ensuring sufficient blood is applied․ The glucometer will begin analyzing the sample, displaying your blood glucose reading within seconds․
Preparing the Lancing Device
Proper lancing device preparation is crucial for a comfortable and accurate blood sample collection․ Begin by removing the protective cap from a new, sterile lancet․ Insert the lancet firmly into the lancing device, following the device’s specific instructions – typically a twisting motion until secure․ Replace the protective cap on the lancet within the device, ensuring it’s properly sealed for safety․
Next, adjust the depth setting on the lancing device․ Start with a shallower setting and gradually increase it if sufficient blood isn’t obtained․ Consider your skin type; thinner skin requires a shallower setting․ Always test the device on a practice pad before using it on your fingertip to confirm the selected depth is appropriate․
Obtaining a Blood Sample
Prior to sampling, wash your hands thoroughly with warm water and soap, then dry completely․ Select a fingertip – the sides are generally less sensitive․ Gently massage your finger towards the puncture site to encourage blood flow․ Avoid squeezing excessively, as this can dilute the sample with tissue fluid, leading to inaccurate results․
Press the lancing device firmly against the chosen fingertip and press the release button․ A small drop of blood should appear․ If insufficient blood emerges, gently massage again, avoiding excessive squeezing․ Wipe away the first drop of blood with a clean, dry cloth, as it may contain tissue fluid․ A second, larger drop is ideal for accurate testing․
Applying Blood to the Test Strip
Ensure your hands are dry and free from any lotions or creams․ Insert a new test strip into the glucometer, observing the correct orientation as indicated on the strip and device․ The glucometer will typically display a readiness symbol, such as a flashing blood drop․ Gently touch the edge of the test strip to the blood drop, allowing the strip to draw in the sample via capillary action․
Do not smear or wipe the blood onto the strip; let it absorb naturally․ A sufficient sample volume is crucial for an accurate reading․ The glucometer will begin counting down, indicating the test is in progress․ Avoid disturbing the glucometer or test strip during this process․ The result will be displayed on the screen within a few seconds․
Reading and Interpreting Results
Once the countdown finishes, your blood glucose level will be displayed on the glucometer’s screen, typically in milligrams per deciliter (mg/dL)․ Refer to the target range provided by your healthcare professional to understand if your reading falls within the desired limits․ Generally, a normal fasting blood glucose level is between 70-100 mg/dL․ Levels above 126 mg/dL on a fasting test may indicate diabetes;
Record your results in a logbook or utilize the glucometer’s memory function for tracking trends․ Consider factors like meal timing, exercise, and medication when interpreting your readings․ If you consistently experience high or low readings, consult your doctor immediately for guidance and adjustments to your diabetes management plan․
Understanding Error Codes
Your Assure Platinum Glucometer utilizes error codes to alert you to potential issues during testing․ “E1” typically indicates an insufficient blood sample, requiring retesting with a larger drop․ “E2” suggests a test strip error – ensure the strip is not damaged, expired, or improperly inserted․ “E3” often signals an internal glucometer error; try resetting the device or contacting customer support․
“Lo” signifies a result below the meter’s measurable range, potentially indicating hypoglycemia, while “Hi” indicates a result above the measurable range, suggesting hyperglycemia․ Always investigate the cause of error codes and avoid relying on questionable results․ Refer to the complete error code list in the manual or online resources for detailed troubleshooting steps․
Common Error Messages and Solutions
Encountering error messages with your Assure Platinum Glucometer is common, but easily addressed․ For “E1 – Insufficient Sample,” apply a larger blood drop to the test strip and retest․ If you receive “E2 – Strip Error,” verify the test strip isn’t damaged, expired, or inserted correctly․ “E3 – Meter Error” may require a device reset; remove the battery for 30 seconds, then reinsert․
“Lo” (Low) results suggest hypoglycemia; confirm proper testing technique and consider consuming a fast-acting carbohydrate․ “Hi” (High) indicates hyperglycemia; retest to confirm, and consult your healthcare provider․ If errors persist, replace the battery, check the lancing device settings, and contact customer support for assistance․ Always document error occurrences for accurate tracking․
Memory Function and Data Review
The Assure Platinum Glucometer conveniently stores your blood glucose readings, allowing for comprehensive data tracking․ This feature aids in identifying trends and managing your diabetes effectively․ To access stored readings, press the “Memory” button on the device․ Use the “Up” and “Down” buttons to scroll through previous results, displaying the date and time of each test․
The glucometer calculates and displays average readings over 7, 14, and 30-day periods, providing valuable insights into your glucose control․ Regularly reviewing this data with your healthcare provider is crucial for adjusting your treatment plan․ Ensure sufficient battery life to retain stored data; low battery levels may result in memory loss․
Recalling Previous Readings
To review past results on your Assure Platinum Glucometer, first ensure the device is powered on․ Press the “Memory” button – this initiates the recall function, displaying the most recent reading with its corresponding date and time․ Subsequently, press the “Up” arrow button to navigate backward through your testing history․ Each press will reveal an older reading, chronologically ordered․
Conversely, utilize the “Down” arrow button to move forward in time, revisiting more recent tests․ The glucometer typically stores up to 500 readings, providing a substantial historical record․ If a reading appears unusual, verify the test date and time to ensure accuracy․ Remember to document any relevant factors, like meals or exercise, alongside your glucose levels for comprehensive analysis․
Averaging Blood Glucose Levels
Calculating averages with your Assure Platinum Glucometer offers valuable insights into your glucose control․ After recalling previous readings (using the “Memory” function), the device automatically calculates and displays average readings over specified periods – typically 7, 14, and 30 days․ Access these averages by repeatedly pressing the “Memory” button after viewing individual results․
These averaged values provide a broader perspective than single readings, helping identify trends and assess the effectiveness of your diabetes management plan․ Consistent monitoring and averaging are crucial for informed discussions with your healthcare provider․ Remember that averages are just one piece of the puzzle; consider individual readings and associated factors for a complete picture․
Maintaining Your Glucometer
Proper maintenance ensures the accuracy and longevity of your Assure Platinum Glucometer․ Regularly cleaning and disinfection are vital․ After each use, wipe the glucometer with a slightly damp cloth and a mild disinfectant․ Avoid harsh chemicals or immersing the device in liquid․
Test strip storage is critical; keep strips in their original, sealed container, away from heat, light, and moisture․ Do not use expired or damaged strips․ Store the glucometer itself in a clean, dry place, protected from extreme temperatures and direct sunlight․ Following these guidelines will help maintain optimal performance and reliable results, contributing to effective diabetes management․
Cleaning and Disinfection
Maintaining hygiene is paramount when using your Assure Platinum Glucometer․ After each testing session, thoroughly clean the device to prevent cross-contamination and ensure accurate readings․ Use a soft, lint-free cloth lightly dampened with isopropyl alcohol (70%) to wipe down the entire exterior surface of the glucometer․
Avoid using harsh chemicals, abrasive cleaners, or immersing the device in any liquid․ Pay particular attention to the test strip port․ Allow the glucometer to air dry completely before storing or reusing․ Regular disinfection minimizes the risk of infection and preserves the device’s functionality, contributing to reliable blood glucose monitoring․
Test Strip Storage
Proper storage of your Assure Platinum test strips is crucial for maintaining their accuracy and reliability․ Always store the strips in their original vial, tightly closed to protect them from moisture, heat, and light․ Exposure to these elements can degrade the chemical reagents, leading to inaccurate blood glucose readings․
Keep the vial in a cool, dry place, ideally between 60°F and 86°F (16°C and 30°C)․ Avoid storing test strips in direct sunlight, humid environments like bathrooms, or near sources of heat․ Do not transfer strips to a different container․ Discard any strips that are expired or appear damaged․ Following these guidelines ensures optimal performance and dependable results․
Glucometer Storage
Proper storage of your Assure Platinum Glucometer is essential for preserving its functionality and extending its lifespan․ When not in use, store the device in a clean, dry place, away from extreme temperatures and humidity․ Avoid direct sunlight and keep it protected from dust and debris․
It’s recommended to remove the battery if the glucometer will not be used for an extended period, preventing potential corrosion․ Do not store the device with the lancing device attached, as accidental activation could occur․ A protective case is ideal for safeguarding against physical damage during storage and transport․ Regular, careful storage ensures consistent performance and reliable readings when you need them․
Troubleshooting Common Issues
Inaccurate Readings: If results seem questionable, ensure the test strip is not expired and correctly inserted․ Confirm adequate blood sample application, avoiding smearing․ Check the lancing device depth setting for sufficient blood flow․ Recalibrate the meter if discrepancies persist, following the manual’s instructions․
Glucometer Not Turning On: First, verify the battery is correctly installed and has sufficient charge․ Replace the battery with a new one if needed․ Inspect the battery compartment for corrosion or debris, cleaning it gently if present․ If the issue continues, attempt a reset by removing and reinserting the battery․ If problems remain, contact customer support for further assistance and potential device evaluation․
Inaccurate Readings
Possible Causes: Several factors can contribute to inaccurate readings․ Expired or damaged test strips are a primary concern; always check the expiration date and ensure proper storage․ Insufficient blood sample size, or applying too little blood to the strip, can also lead to errors․ Contamination of the test strip with substances other than blood will affect results․
Troubleshooting Steps: Verify correct strip insertion and ensure the meter is properly calibrated․ Clean the meter’s test strip port․ Adjust the lancing device depth to obtain an adequate blood drop․ Repeat the test with a new strip․ If inconsistencies persist, compare your results with a laboratory blood glucose test, and contact customer support for assistance․
Glucometer Not Turning On
Potential Issues: If your Assure Platinum Glucometer fails to power on, the first step is to check the battery․ A depleted or incorrectly installed battery is the most common cause․ Ensure the battery is fresh and inserted with the correct polarity (+/-)․ A faulty power button or internal component malfunction could also be responsible․

Troubleshooting Steps: Replace the battery with a new one, confirming proper alignment․ Inspect the battery compartment for corrosion or debris․ Try pressing and holding the power button for several seconds․ If the device still doesn’t respond, attempt a reset (if applicable – consult the full manual)․ If these steps fail, contact customer support for further assistance or potential repair/replacement options․

Safety Precautions
Essential Guidelines: Prioritize safety when using the Assure Platinum Glucometer․ Always wash your hands thoroughly with soap and water before testing to prevent infection․ Never share your lancing device or test strips with others, as this poses a biohazard risk․ Use a new, sterile lancet for each test․
Sharps Disposal & Infection Control: Properly dispose of used lancets and test strips in a designated sharps container, following local regulations․ Avoid touching the blood sample with bare hands․ Clean the glucometer with a disinfectant wipe after each use․ If you experience excessive bleeding or discomfort, seek medical attention immediately․ Store the glucometer and supplies out of reach of children․
Proper Disposal of Sharps
Safe Disposal is Crucial: Used lancets and test strips are considered medical sharps and require careful disposal to prevent accidental needlestick injuries and the spread of infection․ Never discard these items in regular household trash․ Always utilize an FDA-cleared sharps container – these are puncture-resistant, leak-proof, and clearly labeled․
Container Management & Local Regulations: Once the sharps container is approximately three-quarters full, seal it securely according to the manufacturer’s instructions․ Contact your local waste management authority, healthcare provider, or pharmacy for information on proper disposal locations and procedures in your area․ Some communities offer mail-back programs or designated collection sites․ Adhering to these guidelines protects both you and the environment․
Avoiding Infection
Prioritize Hygiene: Maintaining strict hygiene is paramount when performing blood glucose tests․ Always wash your hands thoroughly with soap and warm water before and after each test․ Ensure your testing site on your finger is clean; use an alcohol swab and allow it to dry completely before lancing․ Never share your glucometer, lancing device, or test strips with others․
Glucometer Cleaning & Sterilization: Regularly disinfect the glucometer casing with a 70% isopropyl alcohol wipe, following the manufacturer’s instructions․ Avoid getting liquid into the ports․ Inspect the lancing device for any signs of damage or contamination․ Proper cleaning minimizes the risk of infection and ensures accurate readings․ Consistent adherence to these practices safeguards your health․
Warranty Information
Limited Warranty Coverage: Your Assure Platinum Glucometer is covered by a one-year limited warranty from the date of original purchase against defects in materials and workmanship․ This warranty covers product replacement or repair at the manufacturer’s discretion․ Damage resulting from misuse, accidents, unauthorized repairs, or normal wear and tear is not covered․
Warranty Claim Process: To initiate a warranty claim, please retain your original proof of purchase and contact customer support (see ‘Contact Information for Support’)․ You may be required to return the defective unit for inspection․ The warranty is void if the product has been altered or if the serial number has been removed․ This warranty provides you with specific legal rights․
Contact Information for Support
Customer Service Hotline: For immediate assistance with your Assure Platinum Glucometer, please call our dedicated customer support line at 1-800-ASSURE-1 (1-800-277-8731)․ Our representatives are available Monday through Friday, 8:00 AM to 8:00 PM EST․

Online Support Portal: Visit our comprehensive online support portal at www․assurediabetescare․com/support for frequently asked questions, troubleshooting guides, downloadable user manuals, and video tutorials․ You can also submit a support request through the website․ Email Support: For non-urgent inquiries, email us at support@assurediabetescare․com․ Please allow 24-48 hours for a response․ We are committed to providing excellent support!

Resources for Diabetes Management
American Diabetes Association (ADA): Visit diabetes․org or call 1-800-DIABETES (1-800-342-2383) for comprehensive information on diabetes, including diet, exercise, and medication management․ The ADA offers valuable resources, support groups, and educational programs․
National Institute of Diabetes and Digestive and Kidney Diseases (NIDDK): Explore niddk․nih․gov for research-based information on diabetes prevention, treatment, and complications․ NIDDK provides detailed guides and clinical trial updates․ Diabetes Education Programs: Consider enrolling in a certified diabetes education program to learn self-management skills from qualified healthcare professionals․ Your doctor can provide referrals․ Empower yourself with knowledge!